Basics of xEdit
Introduction
xEdit is a tool for Bethesda titles that you can use to edit plugins (.esp/.esm/.esl files) and have a visual representation of how the edits overlap with the base game or other mods.
This allows you to compare changes and easily do things such as patching, understanding what a mod does, editing mods or the vanilla game, and more.
Setup
- Download the latest xEdit release from the xEdit Discord server, in the xedit-builds channel.
- Extract the archive and place the files inside a folder of your choosing (do not use a UAC protected folder or the game folder).
- Add xEdit to MO2's executables list by pressing CTRL + E and then clicking Add from file..., then point it to xEdit.exe.
Avoid using the x64 executable as it may lead to rounding errors.
It becomes necessary only when dealing with an extremely large volume of data (which is highly unlikely on older titles such as FNV) or during very long sessions.
- Based on the game you are modding, pass the corresponding argument. This is what tells xEdit what game it's meant to look for:
- Oblivion: -TES4
- Skyrim Legendary Edition: -TES5
- Skyrim Special Edition: -SSE (AE or not is irrelevant)
- Fallout 3: -FO3
- Fallout New Vegas: -FNV
- Fallout 4: -FO4 (This is what xEdit defaults to)
- Run the program (always from MO2, for the reason stated before).
Terminology
-
Override: Taking an existing record in a plugin and then editing it in another plugin.
FalloutNV.esm originally created this script, then OldWorldBlues.esm edited it with an override.
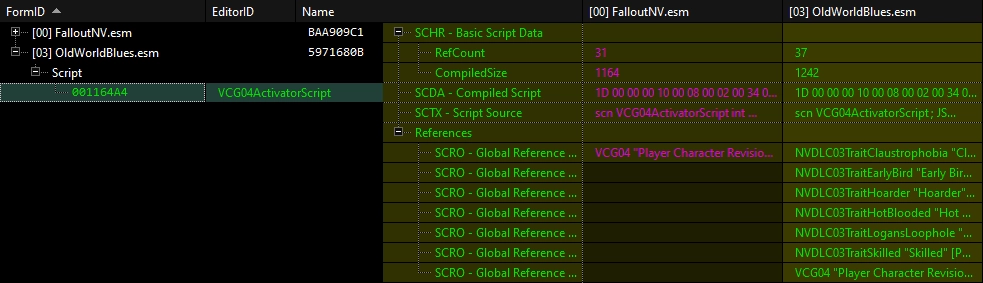
You can view the right-pane of xEdit as an Excel spreadsheet with as many columns as there are plugins editing that record. The game will only care about the right-most column, which is the the script Old World Blues has.
-
Conflict: This happens once you have multiple mods trying to edit a record.
xEdit will represent these conflicts based on their type and with different colors both for the background of that record and for the text (there's a legend on the top right corner of xEdit).
YUP is fixing the Sight Usage value of the BB Gun, but the More Critical Damage mod is trying to increase Critical Damage.
The problem here is that the More Critical Damage mod was not made with YUP in mind, so it did not include that Sight Usage fix.
For this reason, we need to create a patch to forward the Sight Usage so that it is edited at the same time as the Critical Damage.

IMPORTANT: The color of a record indicates the type of conflict it's in.
Green does not mean good and red does not mean bad.
-
Forwarding: Taking a change from a plugin and copying it over to another plugin, most often used for patching conflicts.
Once the patch is created for the conflict above, we went from a conflict that needed intervention to both changes taking effect.
For the best modularity in your load order and to be able to keep track of all of your changes after the installation of a mod, it is a good idea to create patches as new plugins (just like the YUP Patch in the picture above), instead of editing the main plugin.
This also allows you to skip some work when the mod gets updated, since your patch would remain.
Plugin Structure
What are Plugins?
You can think of plugins as a list of objects in unique containers divided based on what type of content is in them (for example one of the "containers" is called WEAP, inside which you fill find the game's weapons).Each of these objects is a record. A record contains a bunch of information inside it about its functionality and characteristics.
The following examples will use a Fallout New Vegas load order, but these concepts are not specific to New Vegas.
The FormID
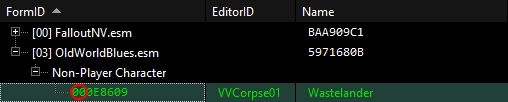
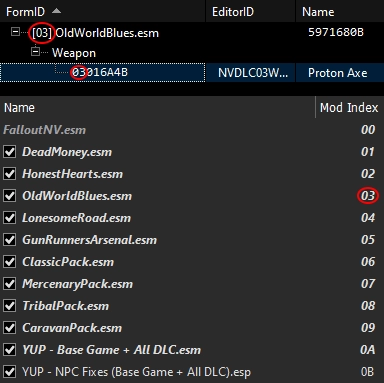
Each of these objects has it's own unique ID called FormID, written in HEX. A FormID is split in 2 parts, the index and the ID itself. The index (indicated by the first 2 digits for non-ESL plugins, the first 5 for ESL plugins) is an indicator of where the plugin that created that record is located in your load order.In this picture, the record I expanded has the FormID 0316A4B, that means that OldWorldBlues.esm created this record and it is placed at index 3, the the record's ID is 16A4B.
If I then randomly select another record in the same plugin, there's a different index. This is because this record was not created by Old World Blues, but the DLC is actually editing a record that was first created by FalloutNV.esm, which sits at index 00 since it is the game's base plugin.
This is an override and it is indicated by there being a color (a unique record with no other plugin involved would be blank, like in the first picture).